Showing posts with label Blogger Help. Show all posts

Receiving Free Text / SMS or Voice message for Approval

By // No comments:
Koi jazba adhoora reh geya hai,
December aansu’on mein beh geya hai,

Yeh dil khamosh ho kar reh geya hai,
Najane aaj woh kya keh geya hai,

Yeh aannkhain hain hamari kitni gehri,
Samundar mein samundar beh geya hai,

Tumhare sath wabasta tha sab kuch,
Siwaye yaad ke kya reh geya hai,

Palat kar dekhne per hum ne jana,
Dil-e-nadaan kya kya seh geya hai,

Bohat bheerr hai bazaron mein lekin,
Tera Arshad akela reh geya hai..

Unlock any Mobile Phone

By // No comments:
Unlock any Mobile

In Order to unlock your Mobile phone related to any Brand of the world . 
Get IMIE number of your Cell Phone by typing *#06# and post it to web:www.foneszone.co.uk and chose your Phone Brand, Model, Country and Carrier and then wait .

You will soon receive the Code to Unlock


Advertisement
Low Cost Web Development

Stolen Mobile Phone Recovery

By // No comments:

How to recover Stolen Mobile Phone ?Insurance

It is very easy to recover your Stolen Mobile Phone if it is insured by simply calling to your Related company .
How to Recover Stolen Mobile Phone?

Contacting your Related Telecommunication Agency 
For Pakistan
You can also make a complain about your Stolen Mobile Phone to your Related Telecommunication Agency and have to follow some simple steps .
In Pakistan you have to Follow following Steps 
  • Get the IMEI number by typing *#06#
  • Call to Police 15
  • Call at PTA toll Free Number 080025625
  • Call CPLC Citizen Police Liaison Company
    Tel : 021-356622 Fax : 021-35683336 web : www.cplc.org.pk
To Provide
  • Cell Phone Number 
  • IMIE number
  • Name 
  • National ID Card Number
  • Adress
  • Write your All Above Information in Comment , we'll inquire about your Phone. And check it back after two days.

How to add Contact Form in Blogger

By // No comments:

Contact Form

Contact Form is the gadget through which you may able to know your Visitor's Behavior about your Blog. It will give a chance to your Visitors to give a beautiful Feedback which is most Important in Blogging.

Contact Form in Blogger
Congratulations now Blogger Comes with its Official Contact From.

Specifications
    • It is more reliable as compared to others
    • It is more simple, fast and user-friendly
    • As it is officially provided by Blogger, so its Biggest benifit is that of totally Spam Free, so you'll not miss any Visitor.
    • So Easy to install in the Blogger
How to Contact Form in Blogger?
Please Follow the simple steps to add Contact Form for Blogger
    1. Goto www.blogger.com and SignIn
    2. Chose your Desired blog in which you want to add the widget
    3. Now Click on "Layout"

    4. Click to "Add a Gadget" where you want to add a Contact Form
    5. Now Click on "More Gadgets" and than chose the option of Contact Form. If you didn't find the form here then you can search manually (given above).
    6. Click here to Subscribe me > Click here

Meta Tag Generator for creating Meta Tags

By // No comments:

Meta Tags and how to generate them

Meta tags are the sources which bring the Search engine (Google, Bing, Yahoo etc) users to your Website . In other words, they are the entrance for the Search Engine Users to visit your website then slowly slowly you website will get the Highest Ranking in the Search Engine like (Google, Bing, Yahoo etc). These codes force the Search Engines to crawl your blog easily and then play the role as a reason to attract your visitors. These codes are being embedded in the Core of your Template so be careful. In Order to create the Meta Tags , Follow the Following Procedure.

How to Use?


  1. In First Section " Description " give the Powerful and Unique description for Blog which will help to crawl the search engine to attract the visitors.
    For my Blog the Description is (My Technical Lab | MTL).
  2. Now comes to " Keywords ", give the Top keywords separated by Commas "," and should related you your blog/site's content .
    Note : For Better Result use those Keywords which you've used in your Blog/Site Posts.
  3. In Author Section , place the name of the Content creator of your Blog/Site (Optional / Only for Fame )
  4. Now at " Robots " Section chose the Index/Follow for your Blog
    Note : If you don't want your website/Blog to be Crawl by search engines then you can simply choose No Index Option .
  5. Now Click on "Generate" and you'll get the HTML Codes which you can easily Copy . Now Place it Just after the <head> tag of your Blogger Template .

How to add / enable Meta Description or content in Blogger?

By // No comments:

Meta Description or Content

Meta Description is an important tool both for Search Engine Optimization or if you want to convince the visitors which use to make related searches to your content on search engines or also being shared on Social Networks.
Meta Description is basically the small definition of your article enclosed in your given Link. As below picture will make you understand about What is meta Description.

What is Meta Content and how to enable it in Blogger
What is Meta Content

Why Meta Content is important for Search Engine Optimization (SEO) ?

Meta Content plays an important rule in SEO of your content as there are different technical and common reasons for this importance. As Meta Content contains the soul of your whole article which convinces the Searchers / Readers to have a complete visit of your platform. 

  • How search engines consider Meta Content - Technical Reason

When you describe your Meta content, Search Engines will definitely start considering it. If it is well described then search engines will start matching with the surfer's query.

    • Well described Meta Content
The content will be perfect and well described if crawlers of search engine will take easy to consider your content. It is one of the important step you have to perform while optimizing your content with respect to Search Engines. There are different rules / manners to define it while writing content with respect to Search Engines. Well described Meta Content will force Search Engines to bring it to top and increase rankings as compared to other sites.
      • Keywords in the content must relate to your Article, as Search Engines are definitely the software so it'll only search for keywords in Meta and match to your whole Article
      • Search Engine's Second priority would be the consideration of Meta Keywords with your Title of Article you want to be searched on Search Engines.
        • Meta Content must contains 1-160 characters, should not be more than this otherwise will prior other sites to give better ranking.
      • NOTE : First two points are not specified by Search engines themselves but experienced Tips by different SEO Experts and Bloggers, whereas third Step should be the implemented in anyway.

    • Why Search Engines give rankings to well described Meta Content - Common Reason

    While describing the Meta Content you should care about the Searcher's needs that what are they searching for. It is your duty to provide exact and most convince-able information which will appear below title and surfers will definitely and chose your platform to read more. More readers will chose your platform means the more times it will be clicked in the search, will be the reason to boost your website's Search rankings

    How to define Meta Description in Blogger's Homepage and Posts?

    Meta Description for homepage is the definition of your website. e.g ; what do you provide, why this platform important for visitors and bla bla. In order to enable and add Meta Description follow the below tutorial.

    1. Go To Blogger Platform and chose your Blog
    2. Go to the settings > Search Preferences > Click Edit and Chose "Yes".

    It is now enabled and your Homepage Description has been defined. And say Hurrah!! because this enabled the Post Description also which just have to define while writing a Post. It is named as Search Description and right there on right-side of New Post. Have a look on picture below.

    This Search Description text will be appeared just below the title when Surfer will search on any Search Engine.
    .
    By // No comments:

    iOS 8 Jailbreak Latest

    By // No comments:
    Shortly afterwards this discharge involving iOS iOS 8 Beta firmware, Jailbreaks began implementing establishing iOS 8 Jailbreak. I am ready for a good iOS 8 Boot-ROM Jailbreak coming from Staff Evad3rs who are this inventors involving Evasi0n Jailbreak application that may jailbreak upto iOS 7. 1. a couple of. We likewise retain a wrist watch upon Pangu Jailbreak Staff whom productively jailbreak iOS 7 within a user friendly plan.

    iOS 8 Jailbreak Link Download : IOS 8 Jailbreak
    iOS 7 Jailbreak Link Download : iOS 7 Jailbreak
    iOS 7.1.1 Jailbreak Link Download : iOS 7.1.1 Jailbreak
    iOS 7.1.2 Jailbreak Link Download : iOS 7.1.2 Jailbreak

    iPhone 6 and iPhone 6 Plus HIT the Market

    By // No comments:
    Brand-new phone versions frequently bring Apple followers outside the house merchants, although observers coming from Quarterly report for you to San francisco thought Friday’s lines were being more time in comparison with inside earlier years, to some extent due to a developing Grey market place.

    Apple’s new 5. 7-inch i phone 6 and 5. 5-inch i phone 6 As well as are usually larger than the actual four-inch exhibit with the i phone 5S. The actual cell phones likewise have greater power supply living, some sort of faster model and a more rewarding camera, foremost Apple Leader Ricky Prepare for you to call this the actual “mother of most improvements. ”

    Mr. Prepare opened the actual doorways with the Apple keep inside Palo Alto, Colorado, definitely not far from Apple’s home office.

    The revolutionary cell phones proceeded sales inside 10 places with Fri, having yet another 20 expected to end up being added in in the near future.

    A few consumers continued to wait to order the actual cell phones and send them anywhere else. A gaggle of 20 for you to thirty Chechen obtained outside the house a great Apple keep inside Paris, France to recover i-phones that they paid out people to order on their behalf; everyone seemed to be allowed to obtain 2 cell phones.

    “I aspire to circumvent thirty i-phones collectively with the finish with the day time, ” said among the adult males, exactly who decreased to provide his / her label. He / she said the actual cell phones can be delivered for you to Moscow, where they would end up being marketed pertaining to up to double the value. Apple is usually expected to start marketing the actual i-phones inside

    The actual grey market place inside Hong Kong seems poised for you to rise considering that the new cell phones aren’t right away accessible in China and taiwan. Recently, Apple unveiled it is new i-phones inside China and taiwan as well as it released worldwide, however the Far east federal hasn’t authorized the revolutionary cell phones available for purchase nevertheless.

    Cell phone retailers inside Mongkok district said the value premium with the gold i phone 6 As well as with hard drive got hopped for you to a lot more than $1, 000. “Asian buyers adore applying large-screen cell phones to observe online video and enjoy online games, ” said Lo Lau, a great manager of the smartphone keep inside Mongkok.

    The writer Lam, some sort of Hong Kong look director, quit the actual Apple keep inside Causeway Bay area having a huge smile and 2 gold i phone 6 Pluses. Mr. Lam said he or she prepared to promote just about every phone pertaining to 20, 000 Hong Kong cash (US$2, 600), some sort of good looking make money from the state list price regarding HK$8, 088.

    Throughout San francisco, Kevin Chen, some sort of 19-year-old student coming from China and taiwan, used the actual i phone 6 As well as he or she ordered by way of preorder since he or she continued to wait inside range to obtain 2 additional i-phones to promote for you to friends inside China and taiwan. In the event he'd been in the home inside China and taiwan, Mr. Chen said he'd have experienced to go to Hong Kong to obtain the new cell phones.

    Before that week, Apple said this received a lot more than four million requests due to the 2 new cell phones inside very first twenty four hours soon after this began taking preorders with September 12 — a lot more than this got put aside pertaining to preorders.

    Apple’s principal creation service provider, Hon Hai Accuracy Marketplace, provides utilized a lot more than 190, 000 folks with in relation to 100 output lines at the Far east manufacturer specifically with the new i-phones, based on folks informed about the matter.

    Online Photo Editing Services

    By // No comments:
    Last day, while browsing on Google I found an Amazing and helpful thing and is Online Photo Editing Service which was totally Free. As you know that I’m a Blogger and need to edit some pictures to make them able to be posted on my blog. Last day I restored my Windows and all Softwares were deleted but I need to edit some Pictures, then I was able to find this beautiful website providing online service for Editing pictures.
    This Website was named as Pixlr. This is the one of the best platform for Creating, Editing and creating Logos online. Due to best server speed, you will not able to differ either working online or on Coral Draw.
    On working on Small Scale you can really use Pixlr because it saves you time and money which you’ll spend on Coral Draw. One of the biggest benefit of Pixlr is its Availability on Android and App Store. To use Pixlr on all platform, please follow Below.
    Use Pixlr Online >> www.Pixlr.com
    Use Pixlr on Android >> Download Pixlr for Android
    Use Pixlr on iOS >> Download Pixlr for iOS

    How to Signup for Adsense?

    By // No comments:
    As you know Adsense is the best earning oppertunity, so it is necessary to learn how to getting started with Adsense. Today I am going to tell you “How to Signup for Adsense”.


    Step1


    Goto this web Address > Adsense and start signing-up procedure.

    Step2


    Write your Blog address and choose your language. Click Continue

    Step3


    Fill all of the Form with correct information because it will use for your Payment process. After Signing-Up Google Adsense will receive your Application for review, after reviewing, Google will give you the ad code to place in your website where you want to show the Ads. Then you’ll be payed for every Valid click from your visitors.

    Boost Adsense revenue by increasing Adsense CPC instantly

    By // No comments:

    Top 5 Experienced Blogger Tips to boost your Adsense Revenue

    This is very important topic for every Blogger to get more than handsome amount from Adsense. After Signing Up for Adsense your wish will be to see the Adsense giving you the amount you wish for. This is Possible when you have enough CPC (Cost-per-click) in your Adsense account. Most of the Bloggers use illegal ways to increase the Adsense CPC and unfortunately get blocked from Adsense account. In today's topic I'll tell you how to Increase your Adsense CPC with Legal and reliable ways so you'll get huge increment in your monthly revenue.


    1st Tip


    Your Blog must have Quality Blog Content / Rich Content neither copied from any website nor from any popular source like books's columns. The Advertisers of Adsense will love to place ads on your Blog as you are providing the best content. It is wish of every Advertiser that they place their Ad where the content is very unique, rich and interactive able to the visitor, for which every advertiser of same category will bid for sake of posting their Ad and al last you'll be offered for best paying Advertiser which increases your CPC. Manage your Content so that your ratio between Visitors and Page views will have enough difference. The visitor which will visit most of your pages and then click the relevant Ad which will increase your Average CPS so will have great increment in net income.

    2nd Tip


    Use SEO for getting most of the visitors for your Blog, so the organic source of your Blog will be more powerful. Adsense believes the visitor which is coming from any source / service of Google like Google search Engine, Google Groups or some other sources as he/she's spending time to achieve his target. 

    3rd Tip

    Try to make the Blog links from USA, UK, Canada, Australia as Google Adsense Pays more cost per click as compared to other European and Asian Countries. We don't know why Google is not taking the customers from other countries serious?

    4th Tip

    This trick is not popular as founded by me :). See your Blog's Content and Ads on Blog from different locations. Note Down the companies websites which are bidding more for Ad Placement on your Blog. There's the trick, Now write one described Article about that Company which bid more for your blog to place their Ads, which will be responsible for increasing the Adsense CPC more and more.

    5th Tip

    Use the Adsense "Sensitive categories" to configure Adsense Ad Placement configuration manually. If your blog is related to Politics then you can choose the Category Politics, if your blog represent Drugs & Supplements then you can choose this category to be Allowed and Block others which din't relates to your content. Sometime Advertisers places irrelevant Ads on Publisher's Site which is responsible to decrease your Average CPC and your net Income get very low.

    Hope you like my tutorial. Like my Facebook Page and write your email below for time to time update thanks.

    What are Sensitive Categories in Adsense?

    By // No comments:

    Sensitive categories

    Sensitive categories are filter of categories of the Ads in Adsense which will be placed on your Blog by different Advertisers. Sensitive categories play Important role in Adsense Management either in Reputation and in CPC (Cost-per-click) too. You can chose the category of Ads to be posted on your Blog, i.e; if you have Political blog then you can Block the ads containing Religion which will increase the clicks, click rate and as well as the reputation of your Blog.

    How to reach Sensitive Categories in Adsense?

    If you want to find Sensitive categories in Adsense then please follow the below procedure Step By Step.

    Step 1

    Goto Adsense Sign In Page and Sign In to your account.

    Step 2

    Goto the "Allow & block ads" and click on "Sensitive categories" as given below in the Picture.

    Step 3

    Allow & block ads according to your blog content and enjoy the best CPC.


    Please subscribe me for best Tutorials. Thanks.

    How to add Google Translator Widget in Blogger?

    By // No comments:

    What is Google Translator?

    Google Translator (Widget) is online website Translation which is use to translate the opened website in your required language. It is very simple and reliable tool to translate the website in your language. Today I am going to show you "How to add Google Translator Widget in Blogger?". If you want to add Google Translator Widget in your website then please follow easy steps below.

    Step 1

    Goto your Blogger Account and open the blog you want to update

    Step 2

    Goto the Layout Button, (see the left sidebar as shown below in Pictures)

    Step 3

    Add a Gadget where you want to add the Google Translator


    Step 4

    After Adding the Google Translator, change the settings as per you want and save it. Open the Blog and let your visitors to read your Blog in their language.
    Hope you enjoyed this tutorial. Please subscribe me below for more tutorials about Blogger Help and Facebook Help.

    How to add Simple Google+ button in Blogger?

    By // No comments:

    What is Google+?

    Google+ is a Social Network provided by Google Inc. It has a great increment in users which also increasing day by day. As we know that Google is serving everywhere on Internet in everything so Google+ is more reliable there as compared to other platforms like Facebook and twitter, take Blogger.com as an Example, if you integrate Google+ with Blogger, then It will automatically show your updated posts on your Google+ profile. There are many other amazing features of Google+ which others don't have, I'll surely discuss in my next posts but today my Topic is "How to add Simple Google+ button in Blogger?" mostly known as "+1 Button". Just follow the simple steps below to know how to add +1 button in Blogger.


    How to add +1 Button in Blogger?

    Step 1

    Goto your Blogger account, Sign In to your Blogger and chose the blog in which you want to add +1 button.

    Step 2

    Click on Layout in left sidebar, as described below in Picture.

    Step 3

    Now click on "Add a Gadget" where you want to add the gadget.

    Step 4

    As this +1 Button widget has given officially by Blogger so you can find easily in the list as given below. Click on that

    Step 5

    After opening the widget you can configure your +1 Button as you wish according to your Blog.

    Hope you liked this tutorial. Please Like my Facebook Page and subscribe my Feeds for further updates. Thanks


    How to Install Custom templates in Blogger?

    By // No comments:
    Dear Friends our Today's topic is "How to Install Custom templates in Blogger?".
    Premium/Custom Blogger templates are beautifully designed templates offered by different companies or developers to explore the Blogger Platform, make it possible to be a beautiful and easy corporate solutions and enhance the Blogging Interests in Blogger.


    Custom Templates in Blogger
    Are you also bored from the Previous Blogger templates too much simple, no more customize-able? Are you seeking for Customized and Beautiful Blogger templates then you came to the right Place.

    Today, I will
      1. Teach you, How to Install Custom Templates in Blogger
    Lets Start and Follow me Step By Step

      1. Download Custom Templates designed By ChirpingBlog, Btemplates.com
      2. Extract the Template in the specified folder
      3. Now, Signin to the Blogger Dashboard and Choose the Blog you want to update
      4. Now goto the Template Section and Click on the Backup/Restore option
      5. After this, you have to Upload the template which you have saved in you Computer. Now upload the XML file and click on Upload. You did it.....


      Now the Blogger Platform has no hold on your Template in case of making changes in your template. You can't change its width, height, Footer, header etc.. but you have to edit it HTML which is not so difficult.
        Now Your Blog is looking more beautiful as compared to before....
        If you want to download my template then SEO enabled Blogger Template. Just you have to make changes in its Layout settings and your Blog will be pumped to Beautiful Look and Fully SEO enabled environment. Enjoy it 

          • Do you love my Articles?
          1. Please Subscribe my Blog Feeds by Clicking on Feeds >> Feeds
          2. Please Like my Facebook page for Live help >>Facebook Like

        Solution for Error 404 (Not Found)!!1 during Browsing

        By // No comments:

        What is Error 404 (Not Found)!!1?

        Error 404 (Not Found)!!1 is the error occurs during browsing because of DNS problems. Some time the your Internet Operator DNS doesn't allow to access the Hosting DNS you want to access. This Problem is very common in Blogger Custom Domains.


        What are Signs of Problem?

        When you want to access any website and error persists, the following signs will help to recognize this Error.

          • Blank Page Error or Website redirects to Google
        When you open the web page with "http/https" you will get the Black Page Error or Sometimes will redirects to Google.

          • Website shows "Error 404 (Not Found)!!1"  page
        When you will access any page of that website from Google Search Engine then you will get "Error 404 (Not Found)!!1" page, as shown below.


        How to Solve "Error 404 (Not Found)!!1" ?

        For the solution of this error you just have to change you DNS settings of your Computer.

        Click below to See

        How to add Google Analytic in Blogger?

        By // No comments:

        Google Analytic

        Google Analytic is a tool and served by Google which helps to track, to keep an eye on your every visitor. It is easily usable in every platform either Blogger, Wordpress or any language like PHP, Html etc...
        You can track any visitor's Live location, see that which page is being visited, know the time which your user have spent on your Website which will be very useful for your marketing campaigns.

        You can analyse the

          1. Bounce rate
          2. Traffic Sources
          3. Location
          4. Active session
          5. Either the Visitor is returning or unique
          6. To which page he moves to
          7. How much time he/she is spending
          8. Total Visitors per day
          9. Total page views per day
        The above given basic introduction about Google Analytic. It has many advanced functions like Google Adsense integration, Google Adwords integration etc.


        How to add Google Analytic in Blogger?


        If you want to add Google Analytic in Blogger then Please follow me Step By Step with pictures references.
          1. Goto here > Google Analytics
          2. Now create an account there by clicking on Sign Up
          3. After Signup, copy the code as given in picture


          4. Now go to Blogger dashboard
          5. Go to Blogger>> Settings>> Others


          6. Paste the copied code as give in Picture below
        Congratulations you can see your visitor live every time. :)

        Do you love my Articles?
        1. Please Subscribe my Blog Feeds by Clicking on Feeds >> Feeds
        2. Please Like my Facebook page for Live help >> Like

        How to change Post Publishing date in Blogger?

        By // No comments:

        How to change Post Publishing date in Blogger?

        When you publish any Post then Blogger automatic set it to the default date. If you want to change your Post publishing date then Please follow me below Step By Step with beautiful picture reference.

        Steps:
          1. Go to your Blogger dashboard and Login
          2. Now Click on the Blog you want to update
          3. Click on the Posts as shown in below Picture
            www.chirpingblog.com


          4. After this, edit your desired post as shown in below Picture
            www.chirpingblog.com
          5. And now Click on Published on, located at right sidebar and Set it.www.chirpingblog.com
        Congratulations you achieved your Goals :) :) :)
          Do you love my Articles?
          1. Please Subscribe my Blog Feeds by Clicking on Feeds >> Feeds
          2. Please Like my Facebook page for Live help >> Like

          How to restore a Deleted blog in Blogger?

          By // No comments:
          Why Blogger deletes a Blog or Puts it in Spam?
          Blogger deletes a Blog or Put it in Spam due to inflowing the Blogger Content Policies. I know i know !! its too difficult to read all of the Policies at one time. So I am giving you the Summary of Blogger Content Policies.

          Blogger Deletes the Blog or Puts it in Spam when the writer
            1. Creates Posts while including Sexual content in his Posts
            2. Includes the child pornography, attracts the children to Sexual content
            3. Uses Bad speech or Abusing content because is very restricted on Blogger www.chirpingblog.com
            4. Writes any article which effects the Publicity of any Google Product
            5. Creates too much redirections to another platform
            6. Redirects a Google Blog especially Blog Posts to any other Platform using Java scripts
            7. Gives the links of such type of Hacking software which can Harms the Computer systems.
          These were the Basic reasons due to which Google put a Blog in Spam or permanent deletes it.

          How to restore a Deleted blog in Blogger?

          If you are interested to restore a Deleted Blog then Follow me and my pictures below. www.chirpingblog.com

            1. Goto www.blogger.com and Login
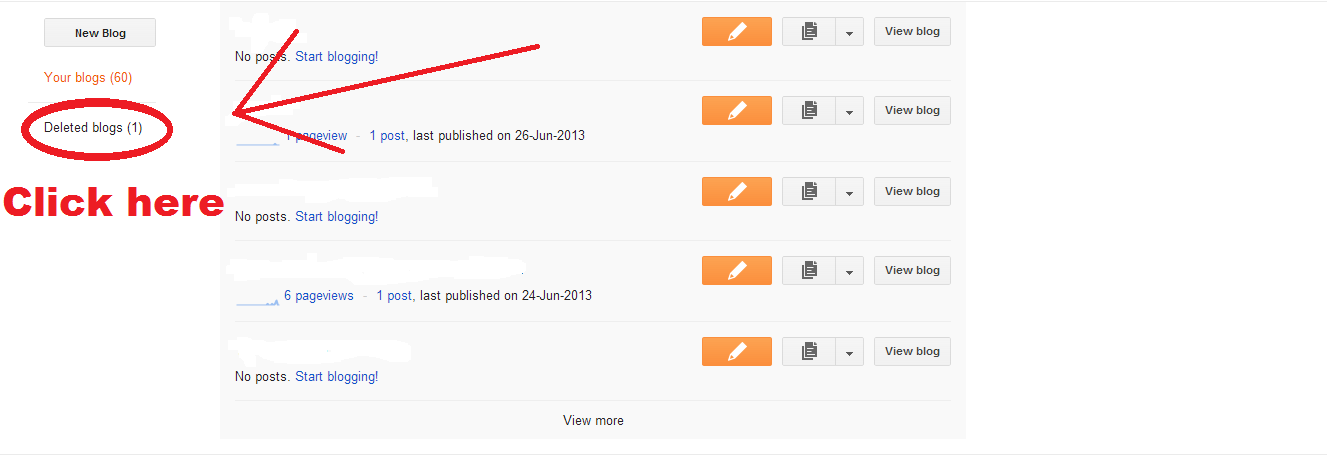
            2. Now in Blogger Dashboard click on "Deleted Blogs" follow the picture reference below
            3. In "Deleted Blogs" click on "Restore" infront of the Blog which you want to restore, follow the picture reference below
            4. Fill the form alongwith the Captcha and then send it
              www.chirpingblog.com
            5. After the Personal review of Google's worker, your Blog will be alive again.